
What is SSH access used for?
SSH (Secure Shell) is a secure way to connect to your site from your computer, using text commands rather than a graphical interface.
Concretely, it's like having a direct remote control for your site: instead of clicking around in WordPress or transferring files one by one via SFTP, you type a command and the server executes it immediately.
SSH access is particularly useful if you want to:
- Optimize or rework hundreds of files in a single command
- Run command-line tools like WP-CLI to control WordPress (search-replace, bulk plugin management, etc.)
- Debug a site when the WordPress dashboard is no longer accessible
- Automate tasks via scripts
It's an advanced feature, mainly used by developers and integrators.
If you're used to managing your site only from WordPress, you probably won't need SSH: in many situations, it's not essential. 🙂
Important information about your SSH access at Copilhost
The available shell is bash.
SSH access is optimized for common WordPress operations (WP-CLI, file transfers…). Resources are therefore limited to guarantee the stability of all hosted sites.
Available binaries:
wp→ WP-CLIphpcomposercurlmysql
PHP extensions calendar, Core, ctype, curl, date, dom, exif, FFI, fileinfo, filter, ftp, gettext, hash, iconv, imagick, json, libxml, mbstring, mysqli, mysqlnd, openssl, pcntl, pcre, PDO, pdo_mysql, Phar, posix, random, readline, Reflection, session, shmop, SimpleXML, sockets, sodium, SPL, standard, sysvmsg, sysvsem, sysvshm, tokenizer, xml, xmlreader, xmlwriter, xsl, zip, zlib
Before you start: what you'll need
To use SSH, you need:
🔑 Private key → it stays on your machine and you never share it.
🔓 Public key → you give it to Copilhost, this is what authorizes you to log in.
Your computer already includes the SSH client you need, you don't need to install anything.
On Mac, open the Terminal app: you'll find it in Applications > Utilities, or by typing "Terminal" in Spotlight search (shortcut Cmd + Space).
On Windows (10 or 11), open the Windows Terminal app or PowerShell: type "PowerShell" in the Windows search bar and click the app.
If you prefer a graphical interface, Termius is a good free alternative.
Step 1: Generate your SSH key
👉 If you already have an SSH key on your computer, you can go directly to Step 2.
⚠️ What to know before starting
The terminal works differently from a classic interface: you have to type (or paste) commands one by one, pressing Enter after each one and waiting for the terminal's response before moving to the next. If you paste several commands at once, it won't work as expected.
First command in the terminal
In your terminal, type or copy-paste the following command (replacing the email with your own), then press Enter:
ssh-keygen -t ed25519 -C "test-copilhost" -f $env:USERPROFILE\.ssh\id_ed25519_test_copilhost💡 What does this command mean?
- ssh-keygen is the tool that generates the key.
- -t ed25519 specifies the type of key/encryption to create (Ed25519, the recommended modern format).
- -C "test-copilhost" is a readable label for you, chosen arbitrarily. You can put whatever you want, or even remove it entirely. Be careful, don't forget the quotes!
- -f $env:USERPROFILE\.ssh\id_ed25519_test_copilhost is the name of the file we choose and its location.
test-copilhost is chosen arbitrarily here. You can choose your own key name.
The only convention is to stay descriptive. For example:
id_ed25519_copilhost→ for Copilhostid_ed25519_myserver→ for a specific serverid_ed25519_work- …
Once the command is launched, the terminal will ask if you want a passphrase.
Enter passphrase (empty for no passphrase) → the terminal offers to protect your key with an additional password. This is optional. Press Enter to skip it, or type a password if you prefer more security (you'll have to retype it every connection).
Enter same passphrase again → confirmation of the previous password. Press Enter again (or retype the same password if you chose one).
ℹ️ If a key already exists: if you had already tried to generate a key before, the terminal will ask Overwrite (y/n)?. Type n to go back, do not overwrite your previous keys.
Create a new one with a different name using the -f parameter, as we did in this tutorial with id_ed25519_test_copilhost. You can then specify which one to use with the -i parameter when connecting.
⚠️ On Windows — error Saving key "..." failed: No such file or directory? This means the .ssh folder doesn’t exist yet on your computer, and ssh-keygen won’t create it for you. Create it with this command in PowerShell:
New-Item -ItemType Directory -Path "$env:USERPROFILE\.ssh" -ForceThen run the ssh-keygen command above again: your key will generate normally.
What you should see at the end
When your key is correctly created, you'll see:
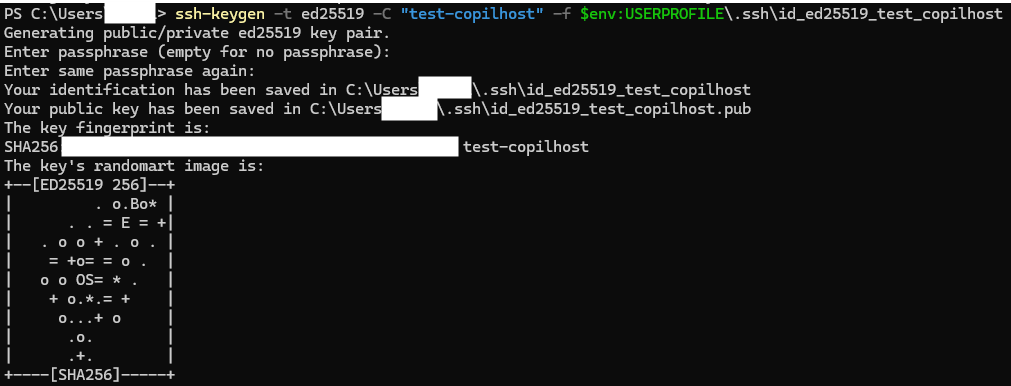
- A message like Your identification has been saved in… and Your public key has been saved in…
- A curious ASCII drawing (with *, o, +…) called randomart. No worries, this is perfectly normal: it's just a unique visual signature of your key, without any practical importance 🎨
Your key is now created. Two files have been generated on your computer:
- id_ed25519_test_copilhost → your private key (to keep secret, never share it!)
- id_ed25519_test_copilhost.pub → your public key (the .pub at the end means "public", this is the one you'll add to Copilhost)
💡 id_ed25519 is the default filename, the same for everyone generating a key of this type. What makes your key unique is the content of the file, not its name. A bit like if everyone had a passport.pdf file on their computer: the name is common, but the content is unique to each person.
Retrieve your public key content
To paste it in Copilhost in the next step, you need to display the content of your public key. Two methods to choose from depending on what feels easier:
Method A: from the terminal
Type the following command (the cat command displays the content of a file in the terminal):
Get-Content $env:USERPROFILE\.ssh\id_ed25519_test_copilhost.pubA long sequence of characters will appear, starting with ssh-ed25519 and ending with your comment (in our example, test-copilhost).
⚠️ On Windows: to copy the text displayed in PowerShell, select it with your mouse then right-click (the shortcut Ctrl + C is used to cancel a running command, not to copy).
Method B: by opening the file directly
If you prefer, you can also find the public key directly from your file explorer:
- On Windows: open File Explorer and go to
C:\Users\your-name\.ssh. Right-click onid_ed25519.pub> Open with > Notepad. - On Mac: open Finder, press
Cmd + Shift + G, type~/.sshand press Enter. Right-click on id_ed25519_test_copilhost.pub > Open with > TextEdit.
⚠️ The .ssh folder is hidden by default. If you don't see it in your explorer, enable display of hidden items: on Windows via the "View" menu > check "Hidden items"; on Mac with the shortcut Cmd + Shift + . (period) in Finder.
Select all the content of the file and copy it. This is the public key you'll paste in Copilhost in the next step.
🔐 Don't worry when copying it: your public key can be freely shared (with Copilhost, a service provider, by email…). It's made to be shared. What must absolutely stay secret is your private key (the id_ed25519 file without the .pub), which stays discreetly on your computer.
Step 2: Add your SSH key to Copilhost
Go to the Copanel, select your site, then click on the "Advanced" tab and scroll down to the "SSH keys" section.
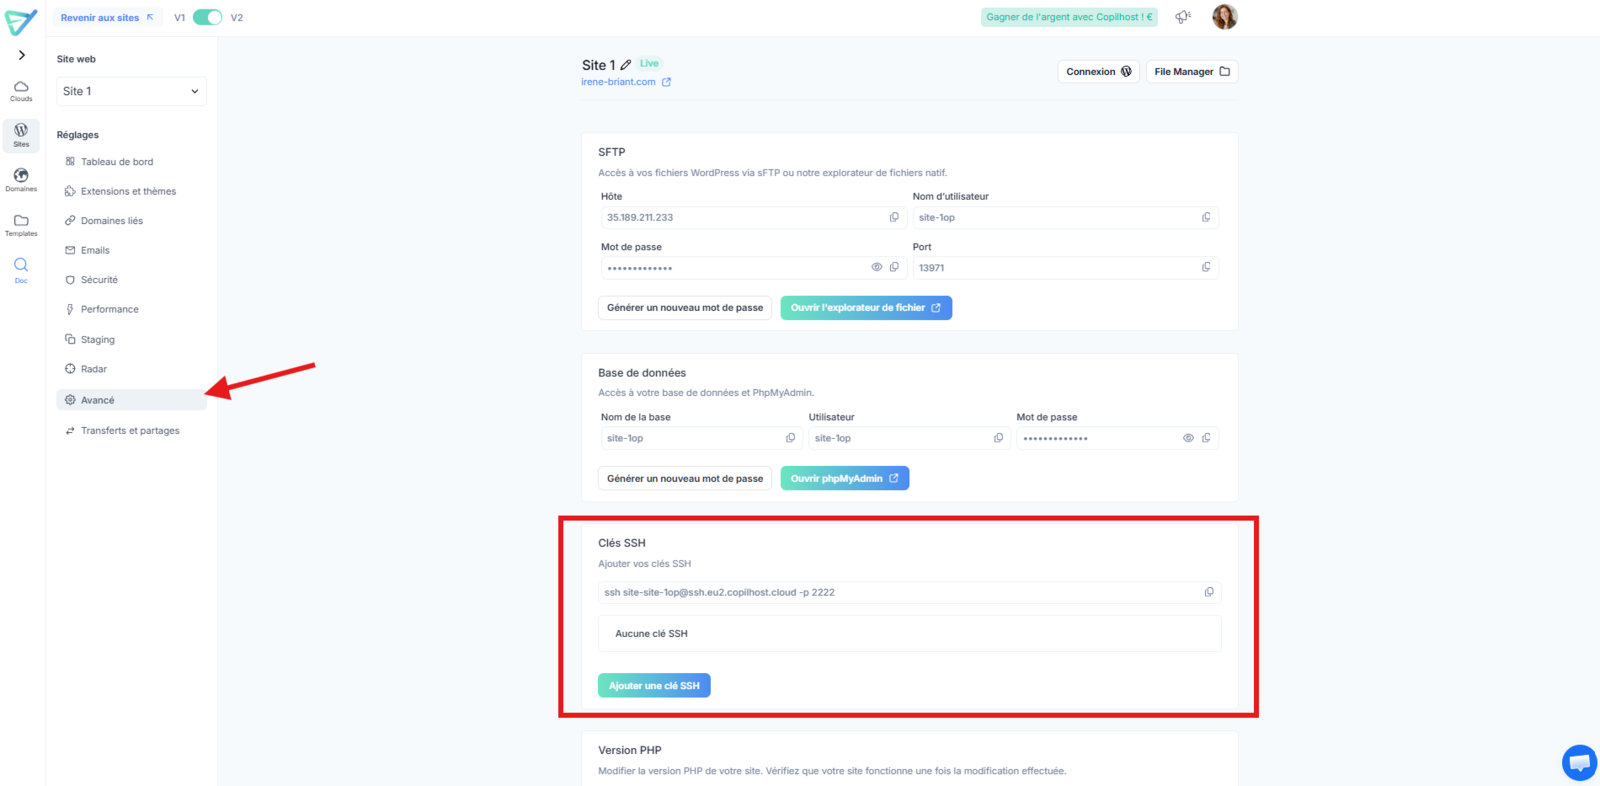
Click "Add an SSH key", then paste your public key into the designated field.
Give it a name that will let you identify it easily (for example: "My personal Mac" or "Desktop computer").
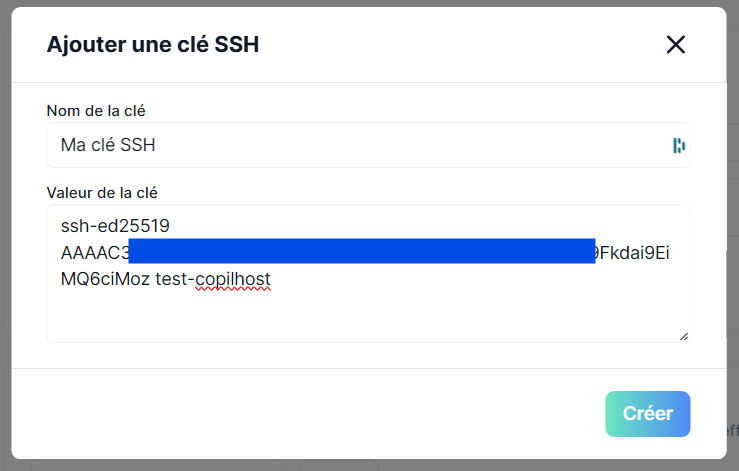
Click "Create" to save ✅
Step 3: Get your connection details
Still in the "Advanced" > "SSH keys" tab, you'll find your connection details:
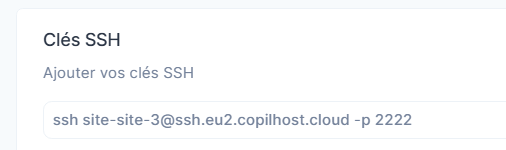
💡 What do the elements of the command correspond to?
site-XXXis a unique identifier specific to your site (example:site-1op)ssh.eu2.copilhost.cloudis the address of the Copilhost SSH server-p 2222specifies the port to use (Copilhost uses port 2222, not the default SSH port)
Step 4: Connect to your site
Open your Terminal and type the following command (replacing site-XXX with your username — this is the command you copy directly from Copilhost):
ssh site-XXX@ssh.eu2.copilhost.cloud -p 2222On your first connection, your computer will ask you to confirm the connection.

SSH displays a fingerprint. Verify that it matches the one of our servers before typing yes:
ssh.eu2.copilhost.cloud → SHA256:yVckN+VWPZBlN8Uni3ulfFZLCiamsmfvwUJVDTmvBQo
Type yes then press Enter.

You're now connected to your site! You can now run any commands you want 🎉
To disconnect, simply type:
exitTo reconnect, type again:
ssh site-XXX@ssh.eu2.copilhost.cloud -p 2222As a reminder, you can find this command in the "SSH keys" section of the advanced menu of your site in Copilhost.
Common issues
Permission denied (publickey) Two possible causes: your public key has not been added to the Copilhost panel, or the username in the connection command is incorrect (check that it matches the one displayed in your panel).
Connection refused or timeout Port 2222 is sometimes blocked by the firewall of some companies or corporate networks. If you're in this case, report port 2222 to your IT department to authorize it.